Thursday, January 14, 2010
THIS PROPERTY HAS BEEN SOLD
For purely personal reasons, we decided to put Hale Hoku Mele on the market. With young family still living on the mainland and in Canada, we were not able to spend enough time there to warrant the annual maintenance that a property like this deserves. This was a difficult decision...but the right one. Some people have commented that we found life for "haoles" too difficult. Nothing could be further from the truth...of all the things we will miss about Hawai'i, we will miss the warm, friendly, and giving culture of aloha the most. To be honest, the amount of rain was probably the biggest surprise to us...but usually all you have to do is drive 15-30 minutes to find some sunshine. Our realtor was great, and if any of you is looking for a recommendation, just post a comment. We have been asked not to advertise her firm or name on this blog.

Sunday, July 26, 2009
Saturday, February 23, 2008
Birthday Update
Tomorrow is my 62nd birthday, and due to insistant demands for new pictures, I am celebrating with a new post! These are just some recent pictures that I took of the living area with "early plastic tub" decor. Actually, things are coming together well...I have been building temporary cabinets and bookcases out of pine and plywood. I used some ohi'a posts for the bedframe. Of course, we had no furniture to move from the RV...which has been sold. Katie has been on the mainland for a couple of weeks, and I'm looking forward to showing her all the additions.
The weather has done a one-eighty from the record setting two-month-long deluge...totalling over fifty inches. We have had almost two weeks with temperatures in the high 70's and NO RAIN! I checked the catchment tank and it is down only about six inches which means we have about 9,500 gallons left...so I am not concerned about a drought, yet.
Enjoy the pics!
Enjoy the pics!
Sunday, January 13, 2008
Post-Script
Our new house is essentially complete...or at least is completely functional. Officially, we still have to jump through the final inspection hoops...but all systems appear to be performing well. I had some minor plumbing leaks to fix, and one ceiling fan was defective and had to be replaced. All that remains now is to "make this house a home" by adding the finishing touches and just living in it. It really doesn't seem possible that we have reached the end of this segment of our adventure. It will be some time before we have finished floors and permanent cabinetry, and that just entails more time and money...and is not very different here in Hawaii from anywhere else. I'm sure that there will continue to be "lessons learned" as we settle into a routine...things that work well or things we would do differently...but those lessons would seem to more appropriately fit a new blog.
Katie and I were just talking about how and when to bring this story to a close. We decided that there will be one more post to this blog after final inspection...which may be a month or more away. Some final photos and reflections on our experience...but if you, the readers, have any specific questions or comments you would like addressed, now is the time to post them! We have already received many comments...all very positive and supportive. But I think the ones that affected us most were those that said (and I paraphrase) "Your blog has given us the information and the courage to move ahead with our dream to build a house and live in Hawaii." Certainly, I would hope that those who DO proceed will let us (and others) know about their efforts. We are truly "lucky to live Hawaii."
Stay tuned for our final post!
Monday, January 7, 2008
Almost There...


I can't believe we are seven days into 2008! Happy New Year to all of you who are following our project! It has been almost two weeks since my last post, and much has transpired during the interim. Although I do have some new photos, I think this will be largely a narrative post...mainly because we have learned a number of new lessons. The title of this post reflects a huge transmigration of sorts, since we have (for all intents and purposes) been able to vacate our RV and move over to the house! This was accomplished none too soon, because "cabin fever" had settled in and threatened to undo all that had been done. On Christmas Eve Day, we packed up our toothbrushes and headed for Kona-side with hopes of outrunning the rain and even finding some sunshine. We spent Christmas Eve at the Sheraton Keahou watching old movies comforted to know that the whole world was not under water! We celebrated Christmas Day basking on the beach.
Since then Katie and I have been painting madly...I think we have brushed and rollered about fifteen gallons so far...primer, walls, ceilings, etc. The results have been stunning...it actually looks and feels like a real home. Due to budget constraints, we had decided some time ago to build some "temporary" countertops and shelves until we could afford the real thing. This was to be plywood carpentry...I bought some 3/4-inch interior plywood at Home Depot...but as you will see in the photos, even plywood is affected by the humidity, so I had some major warping to deal with. Nonetheless, we have achieved functional utlility, and with some nice Douglas fir trim, it won't look too bad.
We called our plumber (who you will notice has NOT been named) and told him we wanted the water supply system hooked up since we had all the components plus 10,000 gallons of water in storage. We desperately wanted hot water, a washing machine and dryer, a shower, and oh yes...a real toilet! Since he was also doing the propane, it meant we could connect the new stove, as well.
OK...time for one of those lessons. Almost everything that comes to Hawaii is shipped by container and can be subjected to destructive forces beyond your wildest imagination. In the past week, we have had to return a half-dozen items that appeared undamaged but upon opening/starting were useless. These included a $300 dehumidifier, a $500 water pump, a $600 UV water sterilizer, and a $50 toilet tank. Suffice it to say that you are well-advised to inspect your purchases carefully noting that even an undamaged box can hide all sorts of wrack-and-ruin within! Thankfully, most retailers will admit this fact and will replace items with few questions asked... A case in point was the water pump which looked like it had been dropped from about thirty feet, despite an intact box. The supplier was sympathetic, but who could know who caused the damage or when it occurred? They agreed to give us a new pump "at cost." When the new pump was brought in, I insisted on inspecting it. By God's grace, it too was smashed...and we got a another new pump...this time, free of charge.
Lesson number two: beware of buying something from one business and having it installed by another. This creates a no-accountability situation with you in the middle and owing both...the plumber blamed the supplier, and the supplier blamed the plumber! Of course, this is sometimes unavoidable like when you buy a light fixture from Sears and have the electrician install it. But you would be wise to open the box, inspect it for broken parts, and let the electrician know that you have found it in good condition, so if something doesn't work, you can at least argue with some degree of certainty about who broke it.
Lesson numero tres. When the drywallers had finished, we were faced with extremely humid conditions, cool temperatures, and interminable drying times. I had some experience with dehumidifiers and had found them very effective in damp basements. Few people here talked about them despite the well-known issues around mold and mildew. We bought the the biggest unit Sears sells (70 pints/day), and in two days, the place felt completely different. Since then, we only run it to keep the humidity at about 65%. Of course, the thing uses electricity, but we feel the benefits are worth the costs.
Ultimately, we got the water supply system working, and it is great. The Bosch instantaneous water heater supplies all the hot water we need, and all the appliances remind us that maybe the "good old days" weren't all that good. Lesson 4...propane is the way to go in Hawaii with electricity costing about fifty cents per kilowatt-hour, but propane appliances require a lot more set-up than electric ones. Most have to be "converted" from natural gas to propane, and that should be done by a technician. Problem is most retailers (like Sears or Home Depot) don't do it...and don't tell you it may cost you an additional $100-$150 per appliance. We found someone on-line that did both our dryer and range for $100...but beware of the hidden cost of propane. Buying quality used might be a good idea, but it still requires a plumber just to tie into the gas line.
A couple of days ago, the weather changed, and we have enjoyed three gorgeous days in the high 70's and negligible rain. And as an "old-timer" here said, "It's like childbirth...when the sun comes out, you will quickly forget the rain" and she was right. Everything looks better, the plants have perked up, the birds are singing, the RV has dried out...even the coffee tastes better! The photos tell all.

I've never seen 3/4-inch plywood do this before.

 Examples of rough countertops and shelves...I'll add some Douglas fir trim and more shelves, and it will look "cabin-style"...all the rage, you know?
 Here's Katie trying out her kitchen and new cast-iron sink at breakfast...note the sunshine through the window.
 Desk and computer area to be completed...
 Living room...yes, that's a television!

Same from a different angle...
The electrician should be here tomorrow to install all the upstairs lights, outlets, and fixtures. After that, we will be pretty much on our own....finally!
Thursday, December 27, 2007
Insulation and Drywall
The rain continues, practically unabated, but we are still making progress! After a brief hiatus for Christmas which we spent drying out on the Kona side of the island, we returned to begin the interior painting. Prior to that, we had put up some insulation in the ceiling and a couple of interior walls. For the ceiling we used R-19 (6") kraft-faced rolls to reduce heat and noise from the metal roof; and for the walls, we used R-12 (3.5") primarily to reduce noise transmission between rooms. I would have preferred to use insulation without the kraft paper (less chance for mold and mildew), but apparently, this stuff is standard on the B.I., and plain fiberglass batts are hard to find.

Here's the living room showing the insulation stapled to the ceiling joists and the wall studs. We decided not to insulate the exterior walls because it doesn't get as hot up here at 1,900' elevation, and the wide roof overhang and the lanai both reduce the sun's impact on the walls. Time will tell if that was a good choice.
 This is Mason and Francois starting to hang the drywall. These guys look small, but they were running around carrying 4' x 12' sheets of gyprock and lifting them up with no assistance. Very often, one crew does the hanging and another does the taping and seamfilling. Even our little house took 58 sheets of gyprock to do the walls and ceiling.

 Rooms are taking shape, and it's starting to look like a house inside! It took them only 2.5 days to finish hanging the drywall including attaching the bull-nose molding on windows, doors, and corners.
 Here's a shot after the taping and seamfilling were done. Unfortunately, I didn't get a picture of Eddie and his son at work, but their card is posted under the "Recommendations" post. They also sprayed on a light "orange-peel" texture. Because of the rain and low nighttime temperatures, we had a 1,500-watt electric heater going to speed the drying process. Even then, it was pretty slow.
 And here's Katie rolling on the primer coat!
Saturday, December 22, 2007
Recommendations
We feel that the sincerest form of praise is to recommend someone to your friends. So in this post, we will provide the business cards of those people who we have worked with on this project, and who have been helpful, honest, diligent, friendly and professional...and who will return your phone calls!!
This first one is Marlon's card. He handled all the foundation and framing work, and has been a valued advisor and friend on all aspects of construction.


This first one is Marlon's card. He handled all the foundation and framing work, and has been a valued advisor and friend on all aspects of construction.


Sunday, December 16, 2007
Gutters & Catchment
This is Week 11, and we are pretty much on schedule. The weather continues to be rain, rain, and more rain, but at least we are working under cover! We hear this is an unusually wet December...something to do with El Nino or La Nina. We have had at least 14 inches so far!
Last week we had the gutters and catchment fill system installed, and none too soon because we were beginning to get erosion and gullying from all the water falling off the roof.
Last week we had the gutters and catchment fill system installed, and none too soon because we were beginning to get erosion and gullying from all the water falling off the roof.
 These guys are from Hawaii Island Rain Gutters. We decided to go with continuous metal gutters rather than the PVC ones. Some folks try to do the PVC themselves, but my experience has been that they always leak. Here is the machine that forms the gutter from rolls of coated aluminum...you can choose from several colors.

In this photo you can see how one continuous length is formed and cut...these are almost 40 feet long. The corners are attached, and then the lengths are raised.

We designed the catchment system to have two downspouts which feed into the horizontal 3-inch PVC pipe. We wanted to keep everything up high to avoid having stagnant water in the feed pipe.
 This shows the fill pipe going to a U-shaped loop which then goes over the tank edge. The vertical pipe and the pipe on the ground are the "first-flush" system that diverts about ten gallons of potentially dirty water before clean water starts flowing into the tank. Check out the free booklet "Rainwater Catchment Systems for Hawaii" available online from http://www.ctahr.hawaii.edu/ for more details.
 This is water flowing out of the overflow pipe about three days after the gutters and catchment were installed. That's how long it took to collect 5,000 gallons (20,000 litres) with all the rain we have had! Our cup runneth over!
Monday, December 10, 2007
Update
Lest you think that we have been overrun by the lava or washed away by the recent flash floods, I thought it best to post an update! The weather has been "unusual" to quote the Tribune Herald... a cold front passed through the Islands bringing high winds and torrential rains. We battened down the hatches and rode it out in our RV, but we did have several trees come down, one too close to the power lines. We recorded almost eight inches of rain over 72 hours...and witnessed spectacular lightning one night...but no other damage. The RV sprung a leak in the bow section, and we had to remove all our books and the mattress in the loft area...but I think I have it caulked now.
During the past week, Marlon has been packing up his tools and equipment...it feels very strange not having him arrive every morning as he has for the past two months. It's a little like having family move away since he has been with us since Day 1. But he still has some odds and ends to complete, and he usually calls at least once a day to see how we are doing. He continues to provide help and advice on future work, although technically his work is done.
We have passed both our plumbing and electrical inspections and are awaiting the framing inspection tomorrow. Once that is done, we can start on the insulation and drywall. We also hope to have the rain gutters and catchment fill-pipe finished this week.
In the meantime, we have been cleaning up around the site and planting some citrus trees and flowering shrubs that have been patiently waiting in the wings for about a month. I've had the chainsaw going trying to clean up some of the carnage from the original ripping of the site, and Katie has been tending her veggies and doing some painting. We've had two sunny days without any significant rain, so we are slowly drying out.
I will keep you up-to-date as our project continues to progress. Here's a photo of the crew plus Katie during our "topping-off" celebration after the roof was completed seveal weeks ago! From left in back: Kalani, Marlon, Aiven; front row: Dayson, Katie, and Stanton.

Thursday, November 29, 2007
Cesspool Overflow
No, we don't have a cesspool overflow! But we would like to document our problems here so no one else has to make the same mistakes.


Today, the cesspool was finally capped with about three tons of concrete, thereby bringing to a close the only bad experience we've had with our project.
Our contractor, Marlon, had recommended a licensed cesspool contractor to us before we even arrived on the island. We put off contacting this person because we wanted to get the lot ripped first and firm up our building plans. At the time our lot was ripped, the folks who did a great job of leveling the lot offered to dig our cesspool for us since they already had the available equipment on-site. Marlon reminded us that he had a licensed cesspool contractor lined up, but we went ahead with the guys who were already running heavy equipment on our lot, especially after they assured us that they worked for a licensed cesspool contractor and could take care of all the paperwork. The price was also very affordable. Almost "too good to be true." Warning....
For whatever reason, these guys didn't finish the job. They did complete the hole and did a pretty good job of that. They also partially constructed the steel covering for the cesspool. Negotiations bogged down when we wanted them to bring the rebar for the concrete lid (which was originally agreed on) and no one showed up. Phone calls were not returned. The worst part was that our paperwork was not signed off and even though we did get the cesspool inspector to inspect and pass the cesspool, we still needed a licensed (note the word "licensed") cesspool contractor to take responsibility for the project. The guy that Marlon originally recommended wasn't willing to do this even for a cash payment of $400. Another contractor that was recommended was in Australia! Weeks went by and we were concerned that we wouldn't be able to pour the concrete lid for the cesspool prior to having a licensed cesspool contractor see the hole and agree to take on the responsibility. Finally, Katie contacted a licensed cesspool contractor that had been recommended on http://www.konaweb.com/ and http://www.punaweb.org/ by the name of Paul Andrade at Excavation Tech. Paul returned the call within 12 hours, and within 24 hours, he arrived on-site, inspected the cesspool, and agreed to sign off on the job. Paul was prompt about getting back to us, and helped us put this situation behind us, and although we haven't actually used him for any excavation or cesspool work, we would recommend him based solely on his aloha. We will include his card on our "Recommendations" post.
And the moral of the story is: listen to your contractor (if he's Marlon Ordonez!) and use a licensed cesspool contractor.
Plumbing, Electrical, Odds and Ends


It's been a busy couple of days...our gorgeous bedroom window has been delivered and installed (altho our screens were damaged and will have to be replaced). Now Marlon will build a small railing on the outside of the window because the building code states that all windows on a second floor must be up so many inches from the floor, whereas we want to be able to look directly out from our bed into our rain forest... it may be that once the final building inspection has taken place, this little "gate" may just happen to fall down, and we will procrastinate (forever) on replacing it. This window has two casement windows on the side for ventilation, but the main picture window will be right over our bed, providing a great view of hapu'u ferns and all of Katie's bromeliads that have been planted on the moss-covered fallen trees to the north of the house.

Our electrician, Ross, and his assistant, Se (pronounced "Say") arrived at 7:30 a.m. yesterday. We made a fast trip into Hilo to pick up some lighting fixtures, and Ross and Se made quick work of installing the pot light boxes, stringing wire, and putting in outlet and switch boxes. These two guys are extremely professional, and not only fast, but thorough. They also don't mind making last minute changes to the plans, which helps! If all goes well, the rough electrical work will be finished today, and then we await the electrical inspection.

Our plumber, Billy, had installed all the rough-in plumbing last Wednesday. The plumbing inspection has already taken place, and Billy has already corrected the two minor issues the inspector disagreed with. So the next time we will see Billy will be after the drywall has been hung, and we're ready to install the sinks and toilet, and connect the propane hot water heater, clothes dryer and stove. Our appliances have been ordered, and should be delivered within another week, so the drywall hangers will have to work around the appliances. What can we do? It's a construction site, and we have limited storage space.
Marlon has been busy finishing up minor projects like the window installation, and making forms for the last concrete pour. One other project we were happy to have him do was to use his tractor to dig holes for five trees that will be planted on the southern (front) side of the house. We now have large holes in the lava for our Washington navel orange tree, a longan tree (a strange tropical fruit that, once peeled, looks like an eyeball, but tastes great!), a Fremont tangerine, a mountain apple (again, a tropical fruit), and a pua kenikeni tree, a flowering tree that produces very fragrant blossoms that were traditionally used in making leis. Pua kenikeni means "10 cent flower" because each bloom used to command that price. The fragrance is heavenly! We will also have a Tahitian lime and a Meyer's lemon in large pots. This leaves several other trees that we have already accumulated that will need to be planted out in the hinterlands once the uluhe is cleared: an avocado, a Manila palm, an ulu (breadfruit), a "forbidden fruit of India" which produces spicy fragrant blossoms, and a mango tree that David started from a very tasty mango we found on the grounds of Queen Lili"uokalani's park in Hilo, one of our favorite places to walk in town. The avocado, mountain apple, and ulu were all given to us by our friends Linnette and Ron who also live in Mountain View. Linnette babysat our guava starts that we brought back from Kauai in February (from Kai Guava Plantation's master gardener, Jack Gushiken, who sweetly gifted us with 6 small guava trees), and those will eventually need to be planted out, too. Anyone for a fruit salad in a year or two???
Marlon and Aiven have become family for us. We all arrived out here on the land a mere 8 weeks ago, and now, thanks to Marlon and crew, we have the lovely bones of a home. Their work is winding down here, and I think we will sorely miss their presence. True to the Hawaiian spirit of aloha, I'm sure we'll stay in touch. We are so grateful for this joyful experience, which wouldn't have been nearly as sweet if it hadn't been for Marlon and his expertise, and his very patient, hardworking, meticulous nature. We truly can't recommend him highly enough. How do you thank someone who has created a work of art that you will now call home?
Saturday, November 24, 2007
Peachy Keen
Well, this is an unexpected post! Marlon, our contractor, offered his painting services and we couldn't argue with his rates...especially in light of the horror stories we had heard about the quotes some people were getting for their painting! So it was off to Home Depot to choose a color scheme and buy some of their tried and tested Behr products...a high quality, latex, semi-gloss exterior paint. We had already decided to go with a tropical theme to go with the Teal roof...and we are very happy with the results.
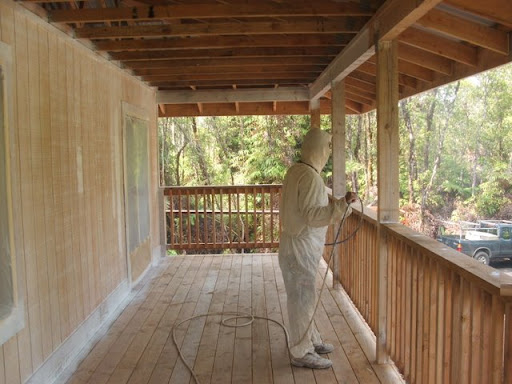 Here's Marlon all decked out to start applying the primer. There really is no substitute for a spray application, especially on the T1-11 siding that soaks up paint like a sponge.
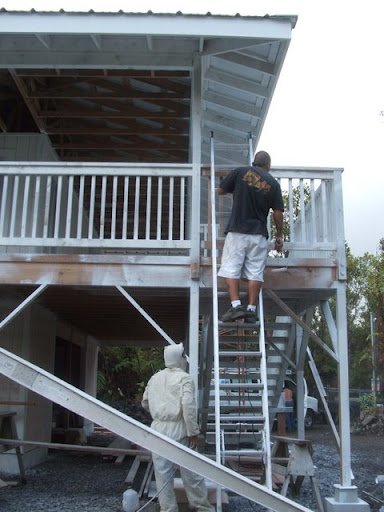 Aiven follows behind with roller to even out the paint and catch any drips or runs.
 In this pic, the priming has been completed and we've started with the base color on the T1-11. Marlon isn't too sure he likes it, but what the heck. With all the rain we get up here, we need a sunny backdrop at all times.
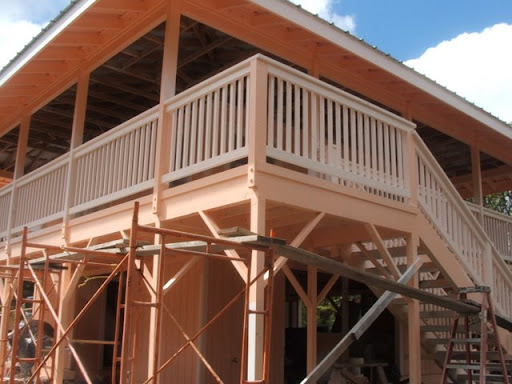 The weather has cooperated and given us a couple of sunny, dry days...so we have gone non-stop. The trim color is a lighter shade of the base...and Marlon thinks it looks like a gingerbread house in the woods! It is bright, but we think it looks good. I think we used 20 gallons of primer, 15 gallons of base color, and 10 gallons of trim.
 This is a shot from the street...the house is more visible than we had planned. We lost some ohi'a trees during the site prep, but we've started some palms and bananas to fill in the spaces. You can see the water tank in the back.
 Here's Marlon all decked out to start applying the primer. There really is no substitute for a spray application, especially on the T1-11 siding that soaks up paint like a sponge.
 Aiven follows behind with roller to even out the paint and catch any drips or runs.
 In this pic, the priming has been completed and we've started with the base color on the T1-11. Marlon isn't too sure he likes it, but what the heck. With all the rain we get up here, we need a sunny backdrop at all times.
 The weather has cooperated and given us a couple of sunny, dry days...so we have gone non-stop. The trim color is a lighter shade of the base...and Marlon thinks it looks like a gingerbread house in the woods! It is bright, but we think it looks good. I think we used 20 gallons of primer, 15 gallons of base color, and 10 gallons of trim.
 This is a shot from the street...the house is more visible than we had planned. We lost some ohi'a trees during the site prep, but we've started some palms and bananas to fill in the spaces. You can see the water tank in the back.
Wednesday, November 21, 2007
Water, Water...Everywhere...
This post is all about erecting the water catchment tank, and since there are a lot of pictures, I thought I would try another slideshow. Click on the little balloon in the lower left corner to see the picture captions, and use the "Pause" button to slow it down.
In this region of Hawaii, most rural homes use a rainwater catchment system composed of the roof, gutters, and a storage tank for their domestic water supply. Fire insurance underwriters require at least 10,000-gallon capacity since there is no other source of water although many older homes have less. Some sources say that a family of four will use 200 gallons of water per day (we use about twenty!), so this represents about fifty days storage if a drought were to occur. We purchased 5,000 gallons delivered by truck to get the system jump-started. When we connect the roof catchment system, we should collect about 1,000 gallons of water for every inch of rainfall. Since Eden Roc receives about 200 inches of rain per year, we should always have a full tank!
I will update this post when we install the gutters, overflow, and "first-flush" components.
Saturday, November 17, 2007
Framing Finished!!
It's been a week since my last post (my apologies to my loyal fans!), but it was not because work had stopped. For all intents and purposes, the framing stage has come to an end. Our contract with Marlon was to get the house "up and tight"...and with the exception of the custom window for the bedroom, we are there. So this post will have lots of pictures, both inside and out, along with some details which are characteristic of Marlon's work.

Here is the northeast corner with missing window and siding...hopefully, the window will be delivered by the end of the month!

Here is a close-up of the stairway...

This is the south-facing front of the house showing all the railing along the lanai. The corner sheer walls are shown below.

This is the east-facing entry side complete with the massive and beautiful stairway.

Here is the northeast corner with missing window and siding...hopefully, the window will be delivered by the end of the month!


The two photos above are of the lanai along the front and side with all the railings installed. From here, Katie and I already spend hours watching and listening. One of our primary goals was to have lots of space for living out-of-doors...our eating area will be out here along with a glider swing and plenty of plants.

This is the u-shaped kitchen area...the window will be over the sink.

This is from the bedroom door where the large window will be installed on the left...the patio doors open onto the lanai.

This is the living area.


These photos show some of the complexities of hip roof framing, and some of the caulking that Marlon does for both appearance and protection from moisture and wood-chewing varmits.

Here is a close-up of the stairway...

with an underneath detail of the tread hangers.
 Lastly, the laundry room under the house.
While Marlon was busy completing the framing, we were back and forth to Hilo buying everything from insulation to toilets to water heaters. I picked up some power tools on sale that I will need for finishwork, and we even picked out the exterior paint colors. The coming week should see the water catchment tank being built, and we are hoping the plumber will start the rough-in work, too.
Subscribe to:
Posts (Atom)
